Form

See highlights and high-quality resources for advanced investigations.

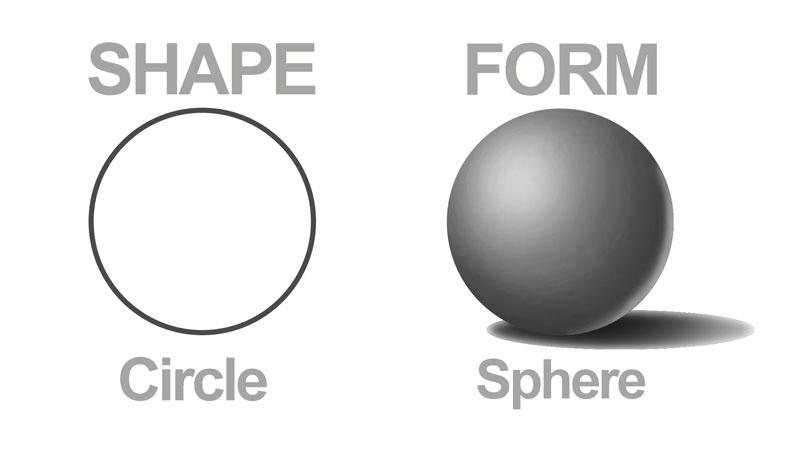
Form (an element of visual art and design) is described as the way an artist arranges elements in the entirety of a composition (i.e. oogle Arts & Culture) and/or it may also be described as any three-dimensional object... measured from top to bottom (height), side to side (width), and from back to front (depth).   Form is also defined by light and dark...— Form defined by WikiPedia

Cover Video: Form: 7 Elements of Art (~12m) —Lillian Gray

   Intro (0:00)

   3D Form (0:00)

   Types of Form (0:56)

   Antoni Gaudi (1:34)

   Zeits Mocaa (2:22)

   Oliver van Hoopt (4:22)

   Nathan Sawaya (4:45)

   Banksy (6:52)

   Trompe Lóeil (7:28)

Introduction

  • Form is an Element of Art & Design.

Organinc Forms

  • Natural Objects Found in Nature

Geometric Forms

  • 3D Forms with Volume

Shapes to Forms

  • 3D Shapes with Volume

Settting a Ground

  • Starting with the Middle Values

Measuring Forms

  • Traditional Measuring and Grids

Forms & Value

  • Light, Dark, & Middle Tones

Shading Forms

  • Blending Values to Create Depth

Forms in Space

  • Horizon Lines & Vanishing Points

Organic Forms

Drawing Natural Forms Trailer (~2:m)

This course will focus on sketching skills to help beginners and those who just want to improve their drawing skills

  A natural form is an object found in nature that has not been changed or altered.   It is still in its natural state.   For example, flowers, leaves, seedpods, bones, skeletons, feathers, birds, fish, animals etc.   │  See examples of art inspired by natural forms at theartyteacher.com

Realism

How to Draw a Autumn Leaf: Realism Challenge #1

(2:20) Circle Line Art School

Botanicals

How to Draw Leaves & Botanicals

Leaves and botanicals are the perfect subject matter for sketching, creative journaling, and for doodling as a way to relax and unwind.


2D Shapes
into 3D Forms
"Through the eye-fooling genre of Trompe L'oeil, we look at techniques artists use to transform shapes into forms." —KQED Arts

  A geometric form is an object with volume of geometric solids i ncluding a capsule, cone, frustum, cube, cylinder, hemisphere, pyramid, rectangular prism, sphere and spherical cap.   Volume Calculator.

Discover the techniques artists use to control and manipulate space in their work:

1. Overlapping: how objects appear to be on top of each other

2. Shading: how adding value (lights & darks), make an object appear three-dimensional

3. Placement: how objects appear to be on top of each other

4. Size: how same size objects appear larger up-close and smaller far away

5. Atmospheric Perspective: how air acts as a filter to change the appearance of distant objects.

6. Linear Perspective: how an object appears smaller the farther away it is

Image/Lesson/Link: Drawing the Illusion of Depth by Mrs. Heredia, Teacher at MCHS
Elements and Principles of Design Shape, Value, Form, and Perspective, Cylinder, Cube, Sphere, Cone
Forms Into Life 1
Forms Into Life 2
Forms Into Life 3

3D Geometric
Forms Into Objects

The illustrated objects above are demonstrated by using one of the technique artists use to create the illusion of depth called Two-point Linear Perspective (how an object appears smaller the farther away it is).

Elements and Principles of Design Shape, Value, Form, and Perspective, Cylinder, Cube, Sphere, Cone

Shade Basic Forms

Shading with hatching, crosshatching, stippling and contour lines or especially by smooth blending, creates the appearance of three-dimensional objects on a two-dimensional surface.   The first step is to "set a ground" as in the seen image above and demonstrated in video demonstration below:

From a PC, hover your cursor over the geometric forms image above to see the spacial difference "setting a ground" (and shadows) make in order to create the illusion of 3-D space on a 2-D surface!


1: Setting a Ground

Video Above: Setting A Ground Drawing Tutorial (10:20): This technique enhances shading and shadows better than beginning with a blank white page.   Instead of starting with an entire sheet at one end of the brightness spectrum, we attempt to start in the middle.   This reduces the tendency to produce a final drawing that is unrealistically bright or washed out.  —Mr. Henls


Step 1:"Set" or create a "ground" (background) by shading and blending an area of solid gray (1, 2, or 3 on the value scale) or varying tones if needed (values 1 to 5).   These tones should correlate with the direction of the light source; one side being darker than the other. Next: Observe the sphere and lighting terms

Shape, Form, Value, Light on a Sphere

2: Light & Shading

Step 2: Set Up One Strong Light Source. (See the terms defined in the videos and image below.)

Highlights, Transitional Light (Center Light and Varying Tones), Core Shadow, Reflected Light, Cast Shadows and Oclusion Shadows give an object a 3-D look on a 2-D surface.
On the assignment example you will also see the cast shadow divided into the umbra, penumbra, and antumbrambra.


Highlight

Highlight refers to the area of an object where the light source shines directly.   They are usually white and determine where the shadows belong on a form. (0:22)

Core Shadow

Core Shadow is just past the terminator and is the darkest part of the shadow on the form.   It is more apparent if there is a second light present. (0:23)

Reflected Light

Reflected Light is the light reflected onto an object by other objects rather than the direct source light.   It plays a major role in realistic drawings. (0:26)

Cast Shadow

Cast Shadows are the shadows of a form cast onto a surface.   If you are standing outside on a sunny day, you will cast a shadow onto the ground. (0:19)


3: Draw & Shade
Basic Forms

Above: How to Shade Basic Forms

Shading is the process of adding to value to a drawing.   When we get the values right, the illusion of form and light are communicated in the drawing.   By learning how to draw basic forms, we can be more successful when drawing more complex subjects.   This exercise is completed on bristol paper, but any drawing paper will result in similar results.   —The Virtual Instructor (9:21)


Step 3: Follow the video demonstration and draw the forms:

sphere (at 0:00)  │  cube (at 2:40)  │  cylinder * (at 5:43)  │  cone * (at 7:10)

*For cylinders and cones, see the additional video:
How to Draw an Ellipse


Forms in Space

Understanding 1, 2 & 3 Point Perspective in under 1 minute!
(1:16) RubberOnion

1  │  2  │  3

  Perspective (from Latin: perspicere "to see through") and Linear perspective always works by representing the light that passes from a scene through an imaginary rectangle (realized as the plane of the painting), to the viewer's eye, as if a viewer were looking through a window and painting what is seen directly onto the windowpane.   If viewed from the same spot as the windowpane was painted, the painted image would be identical to what was seen through the unpainted window.   Each painted object in the scene is thus a flat, scaled down version of the object on the other side of the window.  —    (Refer to Grids and Graphs below.)


One-Point
Linear Perspective

One Point Perspective (10:22)  A horizon line is defined and then one point is placed on the horizon line.   Lines are drawn back to the vanishing point to create 3D forms.Drawing & Painting
—The Virtual Instructor

  One point perspective is when a drawing contains only one vanishing point on the horizon line.   This type of perspective is typically used for images of roads, railway tracks, hallways, or buildings viewed so that the front is directly facing the viewer.   Any objects that are made up of lines either directly parallel with the viewer's line of sight or directly perpendicular (the railroad slats) can be represented with one-point perspective.   These parallel lines converge at the vanishing point (using orthogonal lines). Wikipedia

See the video demonstrations next:

  Horizon Line determines the perspective from which you observe and it is set at the viewer's eye level.(0:43) —

  Vanishing Point is where all the lines in a set converge and are used to show depth in 3-D spaces. (0:23) —

  Orthographic Projection is a 2-D representation of something 3-D using orthoganal lines to create depth. (0:31) —

Interactive-Perspective_562x266.jpg (CC0 1.0)

LINEAR PERSPECTIVE
INTERACTIVE PRACTICE

As mentioned previously, during the Renaissance, artists became preoccupied with new ways of capturing reality such as the use of linear perspective (interactive practice), and the realism possible through the use of illusory techniques.  Discover the techniques that artists use to control and manipulate space in their work.

How to Draw an Ellipse   (6:23) Learn how to draw an ellipse in this tutorial that takes a look at 3 different approaches to ensure accuracy... More Details —The Virtual Instructor


Two-Point
Linear Perspective

Two Point Perspective   (11:50)  Drawing & Painting —The Virtual Instructor

  Two-Point Perspective is when a drawing contains two vanishing points on the horizon line.   In an illustration, these vanishing points can be placed arbitrarily along the horizon.   Two-point perspective can be used to draw the same objects as one-point perspective, rotated: looking at the corner of a house, or at two forked roads shrinking into the distance, for example.   One point represents one set of parallel lines, the other point represents the other.   Seen from the corner, one wall of a house would recede towards one vanishing point while the other wall recedes towards the opposite vanishing point... Wikipedia


Three-Point
Linear Perspective

How to Draw in 3-Point Perspective   (10:13)  Circle Line Art School

  Three-Point Perspective   is often used for buildings seen from above (or below).   In addition to the two vanishing points from before, one for each wall, there is now one for how the vertical lines of the walls recede.   For an object seen from above, this third vanishing point is below the ground.   For an object seen from below, as when the viewer looks up at a tall building, the third vanishing point is high in space... Wikipedia


Foreshortening

What is foreshortening?  (2:41)  Smarthistory

  Foreshortening is the visual effect or optical illusion that causes an object or distance to appear shorter than it actually is because it is angled toward the viewer.   Additionally, an object is often not scaled evenly: a circle often appears as an ellipse and a square can appear as a trapezoid... Wikipedia


Aerial Perspective

What is atmospheric perspective? (1:23)  Smarthistory

  Aerial or Atmospheric Perspective   refers to the effect the atmosphere has on the appearance of an object as it is viewed from a distance.   As the distance between an object and a viewer increases, the contrast between the object and its background decreases, and the contrast of any markings or details within the object also decreases.   The colours of the object also become less saturated and shift towards the background colour, which is usually blue, but under some conditions may be some other colour (for example, at sunrise or sunset distant colours may shift towards red)... WikiPedia


Measuring Methods

Measuring Methods For Artists (2:53)   Artists often use measuring techniques to achieve more accurate, realistic effects.   Measuring is used to calculate relative sizes and proportions and is useful for still lifes, landscapes and even figurative art.   Today we use several measuring methods including:   comparative, sight-size and triangulation." —CroquisCafe

  Principles: Scale / Proportion   Using the relative size of elements against each other can attract attention to a focal point. When elements are designed larger than life, scale is being used to show drama... Wikipedia

Draughtsman Making a Perspective Drawing of a Reclining Woman,ca. 1600 by Albrecht Durer, at the Metropolitan Museum of Art, New York, USA. (CC0 1.0)

Grids & Graphs

  Draughtsman Making a Perspective Drawing of a Reclining Woman, ca. 1600, woodcut (detail) by Albrecht Durer at the Metropolitan Museum of Art, NY, USA

  Grids and Graph Systems Graph paper, coordinate paper, grid paper, or squared paper is writing paper that is printed with fine lines making up a regular grid.   The lines are often used as guides for plotting mathematical functions or experimental data and drawing two-dimensional graphs.  It is commonly found in mathematics and engineering education settings and in laboratory notebooks.   Graph paper is available either as loose leaf paper or bound in notebooks... Wikipedia

Grids can be printed on transparency film:
1 inch, 3/4 inch, and 1/2 inch Grid on one pdf) or online at Grid Drawing Tool by ArtTutor.   See a demonstration of the grid drawing tool and both traditional and digital methods in the next video tutorial. (Some students have also used photo grid tools in their smartphones.)

Vue Fine Art & Design Youtube Cover & Detail of Lyons Cathedral in France

Resources
Linked Info, Audio, Visual +

Below, is a small sample of information links coordinated with video playlists.   Each link and video thumbnail takes you to the category on the Resource page.   Once there, activate the links.   Resources

Creative Commons Public Domain
0 1.0 Universal 0 1.0) License